


atg
Welcome to version 3.2.4 of the "ATG Commerce Platform Solution Library"
This library provides a framework that automates the build from source code and reference data, and promotion of updates from one environment to another for ATG Commerce Platform applications.
The library contains the means to build ATG applications from source code, package build artifacts such as modules and J2EE enterprise archives, and deploy these updates to target environments consisting of both web and application server tiers. This automation also exports data from a source database schema, packages it, deploys and imports it to target database schemas using one standardized end-to-end process.
Over-arching both of these goals the library provides process automation for the coordination of both code and data deployments including data cache management at the application server tier using the RMI interface.
What is it?
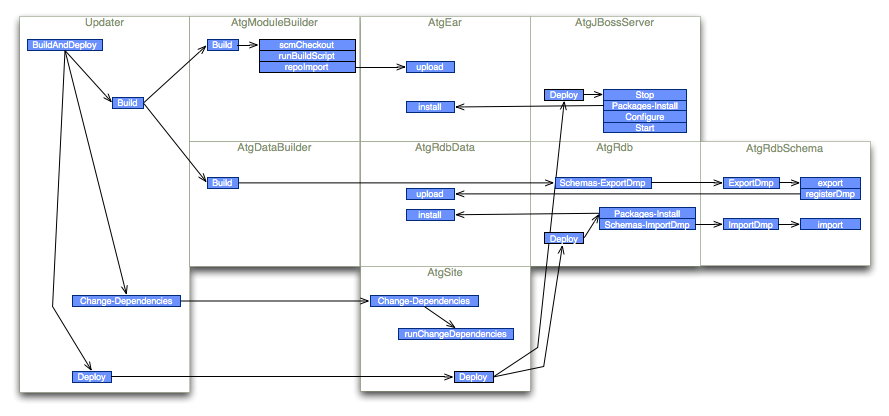
This is a library of command modules that build on the ControlTier automation base types and establish an end-to-end data build and deployment process. This process is defined in terms of command workflows. The figure below describes three primary workflows:
- Coordinated Build and Deploy: This workflow defines the combined end-to-end code module and reference data management process and a single command to execute it called "BuildAndDeploy".
- Code and Data Build: This workflow is responsible for code module builds and exporting data from the master database, packaging them registering them with the repository.
- Code and Data Deploy: This workflow manages the distribution and installation of the application code and reference data packages, installing modules importing the export files.

Why use it?
This library builds on the ControlTier service provisioning platform to offer a number of notable features for organizations where data migration and promotion is an important part of the application lifecycle and is a frequent and critical process:
- End-to-end automation: This framework ties together many individual procedures that are often run independently. Building on the ControlTier base types, this Library offers a single command that: builds code, exports data, packages and versions them, manages package dependencies and deploys to multiple hosts, installing the application and importing data from environment to environment.
- Rollback: All distributions are packaged and versioned. You can rollback to any previous version.
- Task delegation and self-service: You end up with schedulable "jobs" letting a less knowledgeable person run the process on demand or at defined periods.
- Standardized operational interface: End users can rely on simple and predictable commands no matter what environment, database platform, schema or application.
- Reporting: Every deployment is logged. Reports show who deployed what where and when. The full output of the job is saved can can be used for auditing later.
- Graphical interfaces: All operational tasks can be done via a web-based graphical interface. ControlTier's JobCenter is used to run commands while Workbench can be used to review the current deployment environment dependencies.
- Security: Using the ControlTier access control infrastructure, you can control who updates what when and where.
- Extendability: The library offers a working end to end process but it is not monolithic. You can override various parts of the process via sub-typing.
Getting started
You can start using the this library by following the steps of the documentation pages listed below:
Install
Install
Overview
This document describes the installation steps necessary to use the library.
Step #0: Prepare for installation
This solution library has been tested to support a broad range of platform technologies and application topologies, far beyond the scope of this documentation to cover comprehensively. In general, you can assume that the library supports all major release of the ATG Commerce Platform deployed to both DAS and JBoss application servers on both Linux/Unix and Windows servers. Additionally, a number of common database servers (e.g. Oracle, MsSQL and Solid) are supported.
In order to document the journey to a working solution from a "standing start", the following assumptions are made:
- The goal is to deploy the Pioneer Cycling demonstration sample application to a single box.
- Pioneer Cycling is to be built and deployed to the JBoss application server running on a Linux system.
- Catalog and other data will be stored in the Solid database system distributed with the ATG Commerce Platform.
Specifically, then, for this demonstration of the solution library the following software versions are required:
- ATG Commerce Platform 2006.3
- JBoss 4.0.3sp1
- JDK 1.5.0
- Ant 1.7.0
- CentOS release 4.5 (Final), or Redhat Enterprise Linux 4 update 2 or better
In addition, the availability of the following tools in your general environment is assumed:
- Subversion 1.1.4, or later
- Concurrent Versions System (CVS) 1.11.17, or later (installed as "/usr/bin/cvs")
Step #1: Install the ControlTier platform software
This library assumes you have installed the latest stable release of version 3.2.4 of the ControlTier platform software on a a designated server host and one or more client hosts. Refer to the general installation procedures for more info.
You will need to know the URL to the Workbench and JobCenter applications.
Step #2: Download the library archives
Binary distributions of the ATG solution library and the Elements module library upon which it depends can be found in the "File Releases" section of the ModuleForge Download page on Sourceforge. The packages are called "Elemens Module Library" and "Atg Module Library" and will be named something like: {atg|elements}-3.2.4-seed.jar
Make sure you download the latest version 3.2.4 release of both the Elements and ATG libraries.
Step #3: Choose or create a project
All work is done within the context of a "project". You may wish to use the "default" project established when the framework is installed, or you may wish to create a new one just for the use of this library.
- Navigate to the Admin page. (eg., go to the URL: http://localhost:8080/itnav/do/menu/Admin
- Press the "Create Project" button.
(eg., go to the URL:
http://localhost:8080/itnav/do/projects/Input
NoteIf you are following this documentation verbatim in order to configure the Pioneer Cycling demonstration, create a project called "PioneerCycling".
- Fill out the form and press "Create" button. It takes a few minutes for the new project to be created.
Step #4: Load the library archives
Once you have chosen the desired project, you can load the libraries into that project.
Be sure you have already logged into Workbench and selected the desired project where you want the libraries loaded. If you just created a new project, you are all ready.
- Navigate to the Admin page. (eg., go to the URL: http://localhost:8080/itnav/do/menu/Admin
- Press the "Import Seed" button. (eg., go to the URL: http://localhost:8080/itnav/do/projects/ImportSeedInput
- Locate and select the elements-3.2.4-seed.jar file in the file chooser. This is the same file you downloaded in step #2.
- Press the "Import" button.
- Similarly; locate, select and import the atg-3.2.4-seed.jar file
Once the libraries have been installed into your chosen project the next step is to configure these modules for use.
Configure
Configure
Overview
This document describes how to configure a project to use the content library.
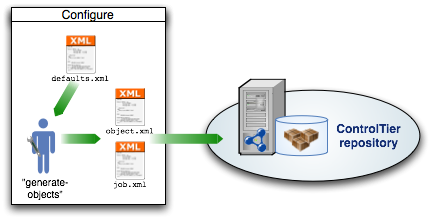
The diagram below illustrates the configuration is driven by a defaults.xml file. This file is used as input by a command generate-objects which in conjunction with template files, produces two output files: object.xml and job.xml.
Step #1: Edit defaults.xml
The defaults.xml file contains all the essential environment-specific information needed by the library. It answers questions like: What box is the ControlTier server? Which box is used for the development environment? Which for staging?
Open a text editor or better yet an XML editor. Cut and paste the contents of the XML shown below and save it to disk You can use the example verbatim if you're looking to setup the Pioneer Cycling demonstration on the same box you installed the ControlTier server on.
<?xml version="1.0"?>

<!-- - - - - - - - - - - - - - - - - - - - - - - - - - - - - - - - - - - - - - - - - - - - -->
<!-- Defaults data for AtgProjectBuilder generate-objects project XML document.            -->
<!--                                                                                       -->
<!-- Defines a set of objects that implements Pioneer Cycling sample application           -->
<!-- development and staging environments deployed to a single box.                        -->
<!--                                                                                       -->
<!-- The target platform is ATG 2006.3 running over JBoss                                  -->
<!--                                                                                       -->
<!-- Defines deployment and setting type objects as they are first used, and subsequently  -->
<!-- refers to objects by type and name whenever they are needed again.                    -->
<!--                                                                                       -->
<!-- This file can be supplied to the ProjectBuilder "generate-objects" command to load    -->
<!-- sample objects into a project that contains the "content" library's type model.       -->
<!--                                                                                       -->
<!-- - - - - - - - - - - - - - - - - - - - - - - - - - - - - - - - - - - - - - - - - - - - -->

<defaults>
        <default>
                <!-- The default node is the framework node of the Ctl client invoking the     -->
                <!-- generate-objects command. (For the default installation this will be      -->
                <!-- "localhost").                                                             -->
                <node>${framework.node}</node>
        </default>

        <!-- The default location of the installation directory for the Pioneer            -->
        <!-- Cycling sample application source files and packages:                         -->
        <installroot>${env.CTIER_ROOT}/demo/atg</installroot>

        <node>
                <!-- The out-of-the box Pioneer Cycling demonstration can be configured to run  -->
                <!-- on from one to five systems. One system must be designated the ControlTier -->
                <!-- server. This is the system where you are running Workbench and Jobcenter.  -->
                <!-- One or two boxes are assigned to the development environment. Builds are   -->
                <!-- run here, and the development JBoss instance and "source" Solid database   -->
                <!-- instance are deployed here. A third and possibly fourth system hosts the   -->
                <!-- staging environment which includes both JBoss and Solid instances.         -->
                <!--                                                                            -->
                <!-- Note that all these systems can be the same box in which case separate     -->
                <!-- JBoss and Solid server instances are started on separate ports.            -->

                <server>${defaults.default.node}</server>
                <development>
                        <applicationserver>${defaults.default.node}</applicationserver>
                        <databaseserver>${defaults.default.node}</databaseserver>
                </development>
                <staging>
                        <applicationserver>${defaults.default.node}</applicationserver>
                        <databaseserver>${defaults.default.node}</databaseserver>
                </staging>
        </node>
</defaults>
You are at liberty to change any of the five box names to systems that make sense in your environment, thereby ending up with the sample Pioneer Cycling development and staging environments deployed to as many five and as few as a single system.
Step #2: Configure library objects
Register and install an AtgProjectBuilder object:
ctl -p project -m Deployment -c Register -- \
      -name name -type  AtgProjectBuilder \
      -basedir $CTIER_ROOT/src/project -installroot $CTIER_ROOT/target/project \
      -install
... or, specifically for the Pioneer Cycling demonstration:
ctl -p PioneerCycling -m Deployment -c Register -- -name atg -type AtgProjectBuilder -basedir $CTIER_ROOT/src/atg -installroot $CTIER_ROOT/target/atg -install
Copy the defaults.xml you created in Step #1 to $CTIER_ROOT/src/project/defaults.xml
Run the generate-objects command:
ctl -p project -t AtgProjectBuilder -o name -c generate-objects -- \
      -name aName \
      -defaults $CTIER_ROOT/src/project/defaults.xml -upload
... or, specifically for the Pioneer Cycling demonstration:
ctl -p PioneerCycling -t AtgProjectBuilder -o atg -c generate-objects -- -defaults $CTL_BASE/depots/PioneerCycling/modules/AtgProjectBuilder/templates/defaults.xml -upload
Before you can run the job, it is necessary to deploy the objects. This is done via the Ctl command, ctl-depot. On the adminstrative node, run:
ctl-depot -p project -a install
... or, if you're following the Pioneer Cycling demonstration setup instructions, more specifically:
ctl-depot -p PioneerCycling -a install
After this command successfully completes, a new set of objects will be loaded into the ControlTier repository. You can view them via AtgProjectBuilder's find-objects command:
ctl -p project -t AtgProjectBuilder -o name -c find-objects -- \
      -name aName
Step #3: Upload job definitions
Run the generate-jobs command:
ctl -p project -t AtgProjectBuilder -o name -c generate-jobs -- \
      -name aName \
      -defaults $CTIER_ROOT/src/project/defaults.xml -upload
... or, specifically for the Pioneer Cycling demonstration:
ctl -p PioneerCycling -t AtgProjectBuilder -o atg -c generate-jobs -- -defaults $CTL_BASE/depots/PioneerCycling/modules/AtgProjectBuilder/templates/defaults.xml -upload
The new jobs will be listed on the home page of JobCenter.
Step #4: Upload packages to the repository
The solution library also manages all the platform (3rd party) software packages needed to establish working ATG Commerce environments. The only assumptions are that you have a compatible OS image at your disposal, a user account with the ControlTier client installed and available, and sufficient disk space to deploy the platform and application software.
The general method of adding 3rd party packages to the ControlTier repository is by uploading them using Workbench:
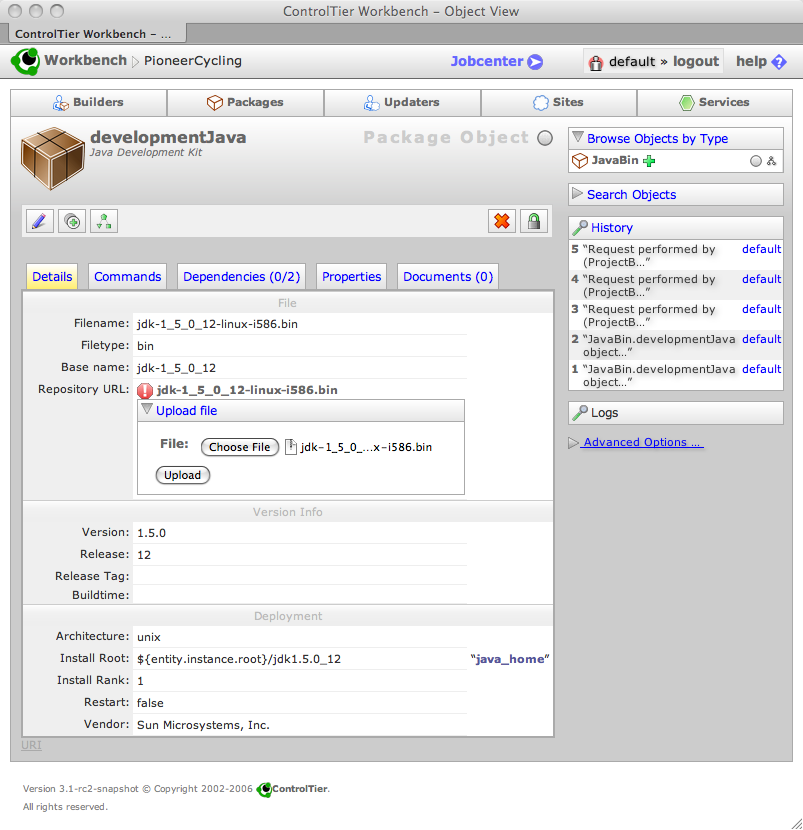
If your intention is to run the Pioneer Cycling demonstration and you have generated and configured the example library objects mentioned above, then upload the following packages into the ControlTier repository via Workbench (i.e. select package objects and upload one at a time):
- The Linux self-extracting file version of Sun's Java Development Kit 5.0 (http://java.sun.com/products/archive/j2se/5.0_12/index.html).
- The binary distribution of Ant 1.7.0 (http://ant.apache.org/bindownload.cgi).
- The Zip version of the JBoss 4.0.3SP1 subscription or community edition (http://labs.jboss.com/jbossas/downloads/)
- The ATG 2006.3 for UNIX binary installer extracted from the downloaded Jar file obtained from their customer product downloads page (https://www.atg.com/esupport/product_resources):
$ jar tvf ATG2006_3-1.jar 0 Wed Jun 28 14:22:34 PDT 2006 META-INF/ 71 Wed Jun 28 14:22:34 PDT 2006 META-INF/MANIFEST.MF 310858852 Wed Jun 28 13:03:02 PDT 2006 ATG2006.3.bin $ jar xf ATG2006_3.jar ATG2006.3.bin $ ls -l ATG2006.3.bin -rw-r--r-- 1 atg atg 310858852 Dec 6 23:25 ATG2006.3.bin - Create and upload an ATG license Zip file called "atg-license-2006.3.0.zip" containing whichever license files are appropriate for your environment:
$ unzip -l atg-license-2006.3.0.zip
Archive:  atg-license-2006.3.0.zip
  Length     Date   Time    Name
 --------    ----   ----    ----
     1177  12-07-07 09:47   ABTestLicense.properties
     1114  12-07-07 09:47   ADCLicense.properties
       27  12-07-07 09:47   ATGSearchLicense.properties
     1157  12-07-07 09:47   B2BLicense.properties
     1099  12-07-07 09:47   B2CLicense.properties
     1141  12-07-07 09:47   CommerceAssistLicense.properties
     1168  12-07-07 09:47   DASLicense.properties
     1223  12-07-07 09:47   DCSABTestLicense.properties
     1183  12-07-07 09:47   DCSADCLicense.properties
     1213  12-07-07 09:47   DPSLicense.properties
     1126  12-07-07 09:47   DSSLicense.properties
     1094  12-07-07 09:47   ForumLicense.properties
     1164  12-07-07 09:47   KnowledgeLicense.properties
     1175  12-07-07 09:47   MerchandisingLicense.properties
     1201  12-07-07 09:47   OutreachLicense.properties
     1091  12-07-07 09:47   PortalLicense.properties
     1242  12-07-07 09:47   PublishingLicense.properties
     1246  12-07-07 09:47   ResponseManagementLicense.properties
     1178  12-07-07 09:47   SelfServiceLicense.properties
 --------                   -------
    21019                   19 files
Step #5: Check out the (ControlTier) Pioneer Cycling demonstration source
Although the Pioneer Cycling sample application itself is distributed with the ATG platform, there is an Ant build file checked into the ATG Solution Library's repository at Moduleforge that is necessary for the demonstration to work. This file is stored in a trivial CVS repository included to represent the source code management (SCM) in a realistic setup.
Checkout the files on whatever system you've designated the development box as follows:
$ mkdir -p $CTIER_ROOT/demo/atg
$ svn checkout https://moduleforge.svn.sourceforge.net/svnroot/moduleforge/atg/branches/3.2.4/demo/PioneerCycling/cvs $CTIER_ROOT/demo/atg/cvs
A  /home/atg/ctier/src/atg/demo/PioneerCycling/cvs/CVSROOT
A  /home/atg/ctier/src/atg/demo/PioneerCycling/cvs/CVSROOT/cvswrappers
A  /home/atg/ctier/src/atg/demo/PioneerCycling/cvs/CVSROOT/cvswrappers,v
.
.
.
A  /home/atg/ctier/src/atg/demo/PioneerCycling/cvs/PioneerCyclingJSP
A  /home/atg/ctier/src/atg/demo/PioneerCycling/cvs/PioneerCyclingJSP/build.xml,v
Checked out revision 419.
Optional Step: Check-in generated files
It is considered best practice to maintain the files generated by generate-objects in a source code repository.
Run
Run
Overview
This section describes how to prepare for and run a code module and data BuildAndDeploy workflow job or command and is pertinent to users responsible for releasing content changes from the source code repository and refernce database to targeted deployment environments.
Their are two interfaces available to execute the BuildAndDeploy commands:
- Using JobCenter, the web-based graphical application,
- Using AntDepo's ad shell command
Instructions for running the BuildAndDeploy command using either interface are explained below.
Preparing to run the Pioneer Cycling demonstration
In general, there are some one-off package installation and builder/service configuration commands to be run before normal ("day-to-day" build and deployment) operations can commence. In particular (regarding the Pioneer Cycling demonstration that has been installed and configured in the previous tabs of this site) execute the following commands from the Ctl client designated as the server system:
- Install and configure the development and staging JBoss and Solid database instances executing these commands from the ControlTier server node:
$ ctl -p PioneerCycling -t Updater -o development -c Prepare
.
.
.
[command.timer.dispatchCmd: 1:04.676 sec]
command completed successfully. Execution time: 1:04.676 sec
dispatched command: Prepare completed for:  (AtgSite) developmentApplicationServer, (AtgSite) developmentDatabase
$ ctl -p PioneerCycling -t Updater -o staging -c Prepare
.
.
.
[command.timer.dispatchCmd: 2:25.871 sec]
command completed successfully. Execution time: 2:25.871 sec
dispatched command: Prepare completed for:  (AtgSite) stagingApplicationServer, (AtgSite) stagingDatabase
- Install the AtgModuleBuilder code builder's package dependencies again executing the command from the ControlTier server node:
$ ctl -p PioneerCycling -t Updater -o development -c Prepare -- -resourcetype AtgModuleBuilder
.
.
.
[command.timer.Prepare: 55.542 sec]
Prepare completed. execution time: 55.542 sec.
dispatched command: Prepare completed for:  (AtgModuleBuilder) development
Once these preparation steps are complete, there are two empty instances of JBoss running each supported by an initial copy of a Solid database instance. The development instance is accessible here: http://localhost:8180, while the staging environment's URL is http://localhost:8280 (assuming you're deploying to a single local node).
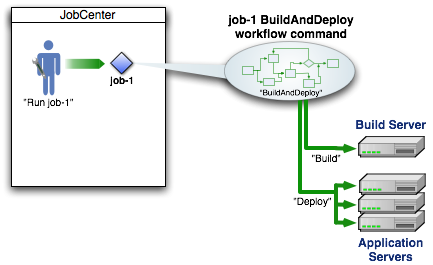
Execute via JobCenter
In Configure Step #3, a new job will have been defined for the BuildAndDeploy process. After logging into JobCenter a list of the defined jobs will be displayed. Choosing and running a job will execute the underlying BuildAndDeploy command.
The general steps to using JobCenter to operate code and data BuildAndDeploy and Update are listed:
- Login to JobCenter
- Identify the desired job
- Run the job
- Customize a report
Considering the specific set of jobs loaded as part of the Pioneer Cycling demonstration:
- Locate and select the "developmentCode.BuildAndDeploy" job and use the "Choose Options and Run Job ..." button to set the "buildstamp" option and "Run Job Now" to run the application code build and deployment process against the development environment:
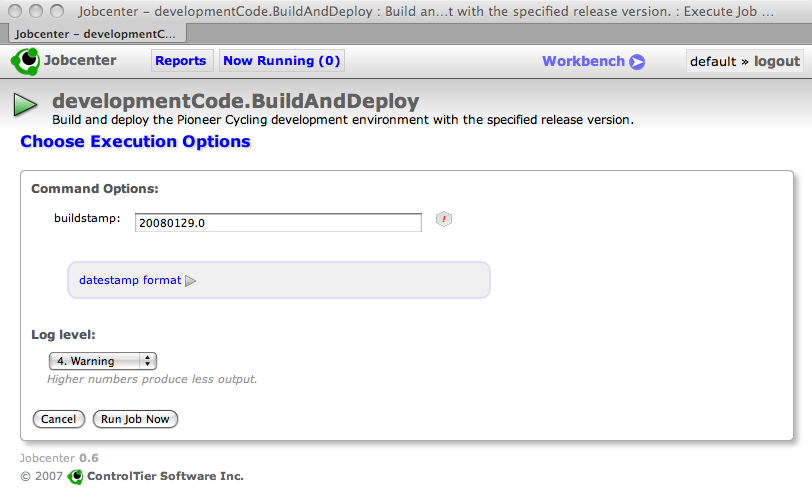 NoteThe "buildstamp" is equivalent to the "release version" of the application. You can choose whatever scheme appeals to you to ensure that each build is uniquely identified.NoteMerely building, deploying and starting the PioneerCyclingJSP ATG module in JBoss for the first time causes the necessary schema to be created in the Solid database.
 - Similarly, using the same buildstamp, find the "developmentCatalog.BuildAndDeploy" job and follow the same process to acquire a database dump and reload it to the development environment.
- Lastly, find the "staging.Update" job and follow the same process to update both the staging application server and database instances with the selected buildstamp.
At this stage the development environment is up and running the Pioneer Cycling sample application: http://localhost:8180/PioneerCycling, and the staging version of the application is at http://localhost:8280/PioneerCycling
Execute via 'ad'
An alternative to executing the these commands via JobCenter is to execute them directly via the ad shell command. The general usage is shown below:
$ ctl -p project -t Updater -o name -c BuildAndDeploy -- \
      -buildstamp buildstamp
A typical convention is to use the date and time as the -buildstamp argument. For example:
$ ctl -p project -t Updater -o name -c BuildAndDeploy -- \
      -buildstamp 200711071500
If you are an experienced AntDepo user, you may also know how to run individual parts of the build and update workflow by running the appropriate command from one of the subordinate commands. For example, to run just the Deploy:
$ ctl -p project -t Updater -o name -c Deploy
Or to run just the build, you can execute the Build workflow separately:
$ ctl -p project -t Updater -o name -c Build -- \
      -buildstamp buildstamp
Reference
Reference
Overview
This section is useful to developers interested how the library works and users interested in knowing all the command syntax offered by the modules in this library.
This library builds on the standard ControlTier "process building blocks" - Package, Builder, Updater, Site and Deployment - each a separate workflow that compose into the single end-to-end workflow command, BuildAndDeploy.
General Command Workflow
The sequence diagram below describes the workflow structure defined by the modules in the library (note that while the diagram depicts the AtgEar and AtgJBossServer types, equivalents exist for deploying DAS too).
Type Model
The diagram below describes the inheritance and composition hierarchies defined by the core types in the library.
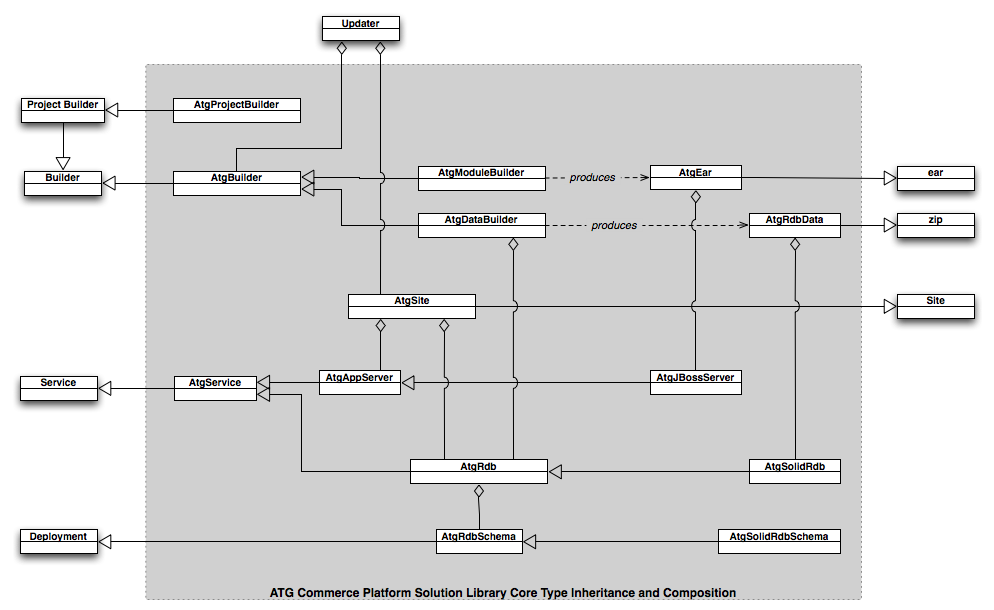
All the attributes and commands are defined in the Type Reference section of the documentation. There you will find a document page for each type.
Types
Type Reference
-
AtgApacheServer: Apache web server
- AtgApachePath: The value of the PATH environment variable used to run the Apache server
- AtgApachePidFile: Location of the Apache server process identifier file
- AtgApacheServerConfigFile: Location of the Apache server configuration file
- AtgApacheSetting: Apache web server settings
- AtgApacheStartCommand: The command to use to start Apache via apachectl (usually "start" or "startssl")
- AtgApacheTimeout: Period to wait (in seconds) before timing out Apache server start/stop commands
- AtgApacheUser: Period to wait (in seconds) before timing out Apache server start/stop commands
-
AtgAppServer: An ATG application server
- AtgAppServername: The configuration name of the atg server
- AtgAppServerSetting: An ATG application server setting
- AtgAppTimezone: A appserver timezone
- AtgDirlist: The list of expected instance sub directories
- AtgRepositoryCache: The RMI component and method to manage flushing a local ATG repository cache
- AtgRmiHost: An RMI host
- AtgRmiPath: Path the the ControlTier RMI component dispatcher
- AtgRmiPort: An RMI listen port
- AtgSwitchingDatasource: An ATG switching datasource configuration item
-
AtgBuilder: General purpose ATG application builder
- BuilderImportPackagePattern: ATG Dynamo Live Config Directory Creation List setting
- BuilderScmUpdate: execute scm update instead of checkout if module appears to be checked out already. If false and module appeas to be checked out then fail
- AtgCatalogRdbSchema: An Atg Catalog schema
- AtgCatalogSchemaPair: Association class between two schema objects
- AtgCatalogUpdater: The product catalog data updater
- AtgConfigBuilder: General purpose ATG config builder
- AtgConfigJar: Jar file of ATG application server (local) configuration
- AtgConfigUpdater: General purpose ATG application module updater
- AtgDasInstallerJar: Jar file of ATG application server (local) configuration
- AtgDasModuleBuilder: A builder sub-type customized to facilitate building and packaging ATG modules for the Dynamo application server
-
AtgDasServer: ATG Dynamo application server
- AtgDasArguments: The set of command line arguments to pass to dynamoStart for a given server
- AtgDasJavaHome: The JAVA_HOME to set for Dynamo server administration
- AtgDasPassword: Password to use for Dynamo server administration
- AtgDasPath: The PATH to set for Dynamo server administration
- AtgDasSetting: A DAS Setting
- AtgDasStartTimeout: Timeout period (in seconds) to wait for Dynamo startup to succeed
- AtgDasStopTimeout: Timeout period (in seconds) to wait for Dynamo shutdown to succeed
- AtgDasUser: User account to use for Dynamo server aadmindministration
- AtgDataBuilder: General purpose ATG data builder
- AtgDataUpdater: runs the corporate data update
-
AtgDynamo: The ATG Dynamo software installation (containing modules and ATG_HOME/DYNAMO_HOME)
- AtgAppServerCollectionSetting: an AtgAppServerCollection setting
- AtgDasRoot: The value of DAS_ROOT
- AtgDynamoInstallUnit: ATG install unit name
- AtgDynamoSetting: ATG Dynamo settings
- AtgEnvironment: An Atg environment
- AtgServerPattern: Type name or regex to dispatch commands
- AtgEar: ATG Java enterprise application archive package
- AtgJBossLocalConfig: A JBoss Environmental Configuration Zip Package
-
AtgJBossModuleBuilder: A builder sub-type customized to facilitate building and packaging ATG modules for the JBoss application server
- AtgJBossHome: Location of the JBoss installation
- AtgListenPort: JBoss listen port
-
AtgJBossServer: An ATG JBoss application server
- AtgCopyFromJBossDefaultInstance: configure new jboss instance from default if true
- AtgDataDir: Directory path to ATG-Data dir
- AtgDynamoModules: Directory path to ATG-Data dir
- AtgDynamoServerName:
- AtgJBBindAddr: JBoss Bind Address
- AtgJBJnpPort: The name of an ATG JBoss Configuration
- AtgJBJrmpRmiObjectPort: JBoss JRMP RMI Object Port
- AtgJBNamingRmiPort: JBoss Naming RMI Object Port
- AtgJBossDirCreateList: ATG Dynamo Live Config Directory Creation List setting
- AtgJBossDirRemoveList: ATG Dynamo Live Config Directory Removal List setting
- AtgJBossDocumentRoot: JBoss Document Root
- AtgJBossEngineLocalhostConfig: arbitrary tomcat engine/localhost configuration
- AtgJBossExtractEar: JAVA_HOME for JBoss
- AtgJBossJavaHome: JAVA_HOME for JBoss
- AtgJBossJavaOpts: Set of Java options to include in the JBoss run.conf file
- AtgJBossJvmRoute: time to wait for startup before timimg out
- AtgJBossLiveConfig: ATG Dynamo Live Config setting
- AtgJBossPidfile: jboss transaction timeout
- AtgJBossPortConfig: JBoss service bindings port configuration
- AtgJBossSetting: A JBoss Setting
- AtgJBossShutdownTimeout: time to wait for shutdown before timing out
- AtgJBossStartupTimeout: time to wait for startup before timimg out
- AtgJBossTransactionTimeout: jboss transaction timeout
- AtgJBPooledServerBindPort: JBoss Pooled Server Bind Port
- AtgJBTcAjpPort: Embedded Tomcat/JBoss AJP Port
- AtgJBTcHttpPort: JBoss HTTP Port
- AtgJBUIL2ServerBindPort: JBoss UIL2 ServerBind Port
- AtgJBWSPort: JBoss WebServices Port
- AtgRmiPort: Dynamo server RMI port value used in "localconfig/atg/dynamo/Configuration.properties".
- AtgJBossServerConfig: A JBoss Environmental Configuration Zip Package
- AtgLicenseZip: A Zip archive of ATG license files
-
AtgMSSqlRdb: A SQL relational database service
- AtgMSSqlRdbInstanceName: Stores the value of an SQL name
- AtgMSSqlRdbSetting: an AtgMSSqlRdb setting
-
AtgMSSqlSchema: Represents an database schema
- AtgMSSqlSchemaSetting: an AtgMSSqlSchema setting
- AtgMerchandising: ATG Merchandising for the ATG Development Platform
-
AtgModuleBuilder: A builder sub-type customized to facilitate building and packaging a single source code module
- AtgAntHome: The Ant installation directory
- AtgAntOpts: The Ant ANT_OPTS setting
- AtgBuilderSetting: An ATG module builder setting.
- AtgBuildFile: The location of the "top-level" build file relative to a CVS module's root directory
- AtgCvs: Location of the CVS executable in the system
- AtgCvsRoot: The value of the CVSROOT environment variable
- AtgCvsRsh: The location of the program for CVS to use for remote connectivity
- AtgDynamoHome: Location of the ATG Dynamo installation server home
- AtgDynamoRoot: Location of the ATG Dynamo installation
- AtgHome: The ATG installation directory
- AtgJavaHome: Location of the Java installation
- AtgModuleBranch: Branch name within the CVS repository (use TRUNK to indicate the main branch)
- AtgModuleLabel: Label within the CVS repository (use HEAD to select the latest sources)
- AtgModuleName: A module name within the CVS repository
- AtgModulePackageType: Package subtype package is imported as
- AtgPath: Value to use for the PATH environment variable when executing system binaries
- AtgPreCompile: pre compile boolean flag
- AtgTarget: Target used with a CVS module's top-level build file
- AtgModuleJar: Jar file of an ATG module
- AtgModuleUpdater: General purpose ATG application module updater
-
AtgOracleRdb: An Oracle relational database service
- AtgOracleRdbInstanceName: Stores the value of an Oracle TNS name
- AtgOracleRdbSetting: an AtgOracleRdb setting
-
AtgOracleSchema: Represents an database schema
- AtgOracleSchemaSetting: an AtgOracleSchema setting
- AtgPatchJar: ATG patch Jar file
- AtgPioneerCyclingProjectBuilder: Pioneer Cycling Project Builder demo
- AtgPlatformInstaller: ATG (JBoss) Platform self-extracting installer package
- AtgPlatformZip: Standard platform zip format package
-
AtgProjectBuilder: Builds and manages projects that use the ATG solution library
- AtgProjectBuilderDefaults: file containing project defaults properties
- AtgProjectBuilderSetting: A AtgProjectBuilder setting.
- AtgProjectBuilderTemplateDir: file containing project template files
-
AtgProjectUpdater: Updater type designed orchestrate the end-to-end build and deployment process
- NotificationList: List of email addresses used by the project updater for workflow success/failure notification
- Requestor: Email address of a project's owner
-
AtgRdb: A relational database service
- AtgRdbConnection: Specifies the Database Connection
- AtgRdbDriver: Specifies the Database Driver
- AtgRdbEncryptedPassword: An encrypted rdb user's password
- AtgRdbInstanceName: Stores the value of the database instance name
- AtgRdbPassword: A schema user's password
- AtgRdbPort: Specifies the Database Connection Port
- AtgRdbSetting: an AtgRdb setting
- AtgRdbType: Specifies the unique key value identifying which type database type is in use (e.g. "mssql" or "oracle", etc)
- AtgRdbUserName: A user for a schema
-
AtgRdbData: A databases schema dump
- AtgRdbInstallRoot: Specifies the location where dump files are unpacked prior to being loaded into the target database.
- AtgRdbSetting: an AtgRdb setting
- AtgRdbDataScripts: A databases schema dump
- AtgRdbModuleScripts: A databases schema dump
- AtgRdbOracleScripts: A databases schema dump
-
AtgRdbSchema: Represents a database schema
- AtgRdbDataSourceName: JNDI data source name for connecting to the schema
- AtgRdbMaxPoolSize: DataSource maximum connections
- AtgRdbMinPoolSize: DataSource minimum connections
- AtgRdbSchemaEncryptedPassword: An encrypted schema user's password
- AtgRdbSchemaName: A schema name
- AtgRdbSchemaPassword: A schema user's password
- AtgRdbSchemaSetting: an AtgRdbSchema setting
- AtgRdbSchemaTransactionIsolation: Schema Transaction Isolation value
- AtgRdbSchemaType: A schema name
- AtgRdbSchemaUserName: A user for a schema
- AtgScriptsRdb: A SQL relational database service
-
AtgService: General purpose ATG service type
- AtgLocalConfig: Location of the local configuration directory for the service
- AtgServiceSetting: An ATG Service Setting
-
AtgSite: Controls the ATG Site
- AtgSiteSetting: General AtgSite settings
- AtgSiteSSHUser: The Setting which overrides the default ssh user when executing remote commands
- AtgSolidRdb: Solid database service
- AtgSolidRdbSchema: Represents a Solid database schema
- AtgUpdater: General purpose ATG package updater
- JcePolicyZip: Java Cryptology Extension Package
- ServiceMediator: Mediates actions across multiple services