


Run
Overview
This section describes how to prepare for and run a code module and data BuildAndDeploy workflow job or command and is pertinent to users responsible for releasing content changes from the source code repository and refernce database to targeted deployment environments.
Their are two interfaces available to execute the BuildAndDeploy commands:
- Using JobCenter, the web-based graphical application,
- Using AntDepo's ad shell command
Instructions for running the BuildAndDeploy command using either interface are explained below.
Preparing to run the Pioneer Cycling demonstration
In general, there are some one-off package installation and builder/service configuration commands to be run before normal ("day-to-day" build and deployment) operations can commence. In particular (regarding the Pioneer Cycling demonstration that has been installed and configured in the previous tabs of this site) execute the following commands from the Ctl client designated as the server system:
- Install and configure the development and staging JBoss and Solid database instances executing these commands from the ControlTier server node:
$ ctl -p PioneerCycling -t Updater -o development -c Prepare
.
.
.
[command.timer.dispatchCmd: 1:04.676 sec]
command completed successfully. Execution time: 1:04.676 sec
dispatched command: Prepare completed for:  (AtgSite) developmentApplicationServer, (AtgSite) developmentDatabase
$ ctl -p PioneerCycling -t Updater -o staging -c Prepare
.
.
.
[command.timer.dispatchCmd: 2:25.871 sec]
command completed successfully. Execution time: 2:25.871 sec
dispatched command: Prepare completed for:  (AtgSite) stagingApplicationServer, (AtgSite) stagingDatabase
- Install the AtgModuleBuilder code builder's package dependencies again executing the command from the ControlTier server node:
$ ctl -p PioneerCycling -t Updater -o development -c Prepare -- -resourcetype AtgModuleBuilder
.
.
.
[command.timer.Prepare: 55.542 sec]
Prepare completed. execution time: 55.542 sec.
dispatched command: Prepare completed for:  (AtgModuleBuilder) development
Once these preparation steps are complete, there are two empty instances of JBoss running each supported by an initial copy of a Solid database instance. The development instance is accessible here: http://localhost:8180, while the staging environment's URL is http://localhost:8280 (assuming you're deploying to a single local node).
Execute via JobCenter
In Configure Step #3, a new job will have been defined for the BuildAndDeploy process. After logging into JobCenter a list of the defined jobs will be displayed. Choosing and running a job will execute the underlying BuildAndDeploy command.
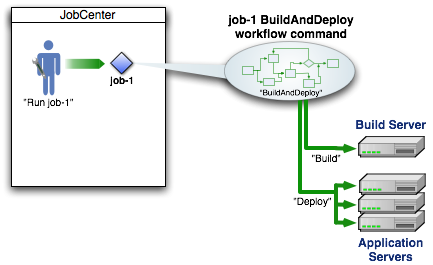
The general steps to using JobCenter to operate code and data BuildAndDeploy and Update are listed:
- Login to JobCenter
- Identify the desired job
- Run the job
- Customize a report
Considering the specific set of jobs loaded as part of the Pioneer Cycling demonstration:
- Locate and select the "developmentCode.BuildAndDeploy" job and use the "Choose Options and Run Job ..." button to set the "buildstamp" option and "Run Job Now" to run the application code build and deployment process against the development environment:
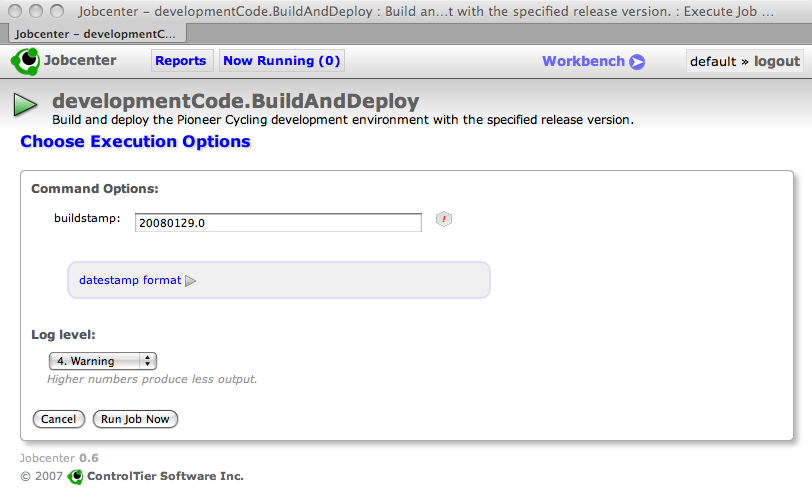 NoteThe "buildstamp" is equivalent to the "release version" of the application. You can choose whatever scheme appeals to you to ensure that each build is uniquely identified.NoteMerely building, deploying and starting the PioneerCyclingJSP ATG module in JBoss for the first time causes the necessary schema to be created in the Solid database.
 - Similarly, using the same buildstamp, find the "developmentCatalog.BuildAndDeploy" job and follow the same process to acquire a database dump and reload it to the development environment.
- Lastly, find the "staging.Update" job and follow the same process to update both the staging application server and database instances with the selected buildstamp.
At this stage the development environment is up and running the Pioneer Cycling sample application: http://localhost:8180/PioneerCycling, and the staging version of the application is at http://localhost:8280/PioneerCycling
Execute via 'ad'
An alternative to executing the these commands via JobCenter is to execute them directly via the ad shell command. The general usage is shown below:
$ ctl -p project -t Updater -o name -c BuildAndDeploy -- \
      -buildstamp buildstamp
A typical convention is to use the date and time as the -buildstamp argument. For example:
$ ctl -p project -t Updater -o name -c BuildAndDeploy -- \
      -buildstamp 200711071500
If you are an experienced AntDepo user, you may also know how to run individual parts of the build and update workflow by running the appropriate command from one of the subordinate commands. For example, to run just the Deploy:
$ ctl -p project -t Updater -o name -c Deploy
Or to run just the build, you can execute the Build workflow separately:
$ ctl -p project -t Updater -o name -c Build -- \
      -buildstamp buildstamp