


Configure
Overview
This document describes how to configure a project to use the content library.
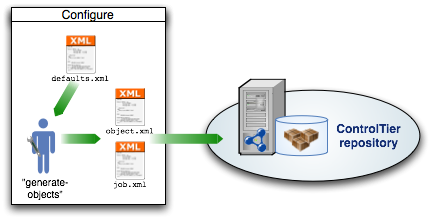
The diagram below illustrates the configuration is driven by a defaults.xml file. This file is used as input by a command generate-objects which in conjunction with template files, produces two output files: object.xml and job.xml.
Step #1: Edit defaults.xml
The defaults.xml file contains all the essential environment-specific information needed by the library. It answers questions like: What box is the ControlTier server? Which box is used for the development environment? Which for staging?
Open a text editor or better yet an XML editor. Cut and paste the contents of the XML shown below and save it to disk You can use the example verbatim if you're looking to setup the Pioneer Cycling demonstration on the same box you installed the ControlTier server on.
<?xml version="1.0"?>

<!-- - - - - - - - - - - - - - - - - - - - - - - - - - - - - - - - - - - - - - - - - - - - -->
<!-- Defaults data for AtgProjectBuilder generate-objects project XML document.            -->
<!--                                                                                       -->
<!-- Defines a set of objects that implements Pioneer Cycling sample application           -->
<!-- development and staging environments deployed to a single box.                        -->
<!--                                                                                       -->
<!-- The target platform is ATG 2006.3 running over JBoss                                  -->
<!--                                                                                       -->
<!-- Defines deployment and setting type objects as they are first used, and subsequently  -->
<!-- refers to objects by type and name whenever they are needed again.                    -->
<!--                                                                                       -->
<!-- This file can be supplied to the ProjectBuilder "generate-objects" command to load    -->
<!-- sample objects into a project that contains the "content" library's type model.       -->
<!--                                                                                       -->
<!-- - - - - - - - - - - - - - - - - - - - - - - - - - - - - - - - - - - - - - - - - - - - -->

<defaults>
        <default>
                <!-- The default node is the framework node of the Ctl client invoking the     -->
                <!-- generate-objects command. (For the default installation this will be      -->
                <!-- "localhost").                                                             -->
                <node>${framework.node}</node>
        </default>

        <!-- The default location of the installation directory for the Pioneer            -->
        <!-- Cycling sample application source files and packages:                         -->
        <installroot>${env.CTIER_ROOT}/demo/atg</installroot>

        <node>
                <!-- The out-of-the box Pioneer Cycling demonstration can be configured to run  -->
                <!-- on from one to five systems. One system must be designated the ControlTier -->
                <!-- server. This is the system where you are running Workbench and Jobcenter.  -->
                <!-- One or two boxes are assigned to the development environment. Builds are   -->
                <!-- run here, and the development JBoss instance and "source" Solid database   -->
                <!-- instance are deployed here. A third and possibly fourth system hosts the   -->
                <!-- staging environment which includes both JBoss and Solid instances.         -->
                <!--                                                                            -->
                <!-- Note that all these systems can be the same box in which case separate     -->
                <!-- JBoss and Solid server instances are started on separate ports.            -->

                <server>${defaults.default.node}</server>
                <development>
                        <applicationserver>${defaults.default.node}</applicationserver>
                        <databaseserver>${defaults.default.node}</databaseserver>
                </development>
                <staging>
                        <applicationserver>${defaults.default.node}</applicationserver>
                        <databaseserver>${defaults.default.node}</databaseserver>
                </staging>
        </node>
</defaults>
You are at liberty to change any of the five box names to systems that make sense in your environment, thereby ending up with the sample Pioneer Cycling development and staging environments deployed to as many five and as few as a single system.
Step #2: Configure library objects
Register and install an AtgProjectBuilder object:
ctl -p project -m Deployment -c Register -- \
      -name name -type  AtgProjectBuilder \
      -basedir $CTIER_ROOT/src/project -installroot $CTIER_ROOT/target/project \
      -install
... or, specifically for the Pioneer Cycling demonstration:
ctl -p PioneerCycling -m Deployment -c Register -- -name atg -type AtgProjectBuilder -basedir $CTIER_ROOT/src/atg -installroot $CTIER_ROOT/target/atg -install
Copy the defaults.xml you created in Step #1 to $CTIER_ROOT/src/project/defaults.xml
Run the generate-objects command:
ctl -p project -t AtgProjectBuilder -o name -c generate-objects -- \
      -name aName \
      -defaults $CTIER_ROOT/src/project/defaults.xml -upload
... or, specifically for the Pioneer Cycling demonstration:
ctl -p PioneerCycling -t AtgProjectBuilder -o atg -c generate-objects -- -defaults $CTL_BASE/depots/PioneerCycling/modules/AtgProjectBuilder/templates/defaults.xml -upload
Before you can run the job, it is necessary to deploy the objects. This is done via the Ctl command, ctl-depot. On the adminstrative node, run:
ctl-depot -p project -a install
... or, if you're following the Pioneer Cycling demonstration setup instructions, more specifically:
ctl-depot -p PioneerCycling -a install
After this command successfully completes, a new set of objects will be loaded into the ControlTier repository. You can view them via AtgProjectBuilder's find-objects command:
ctl -p project -t AtgProjectBuilder -o name -c find-objects -- \
      -name aName
Step #3: Upload job definitions
Run the generate-jobs command:
ctl -p project -t AtgProjectBuilder -o name -c generate-jobs -- \
      -name aName \
      -defaults $CTIER_ROOT/src/project/defaults.xml -upload
... or, specifically for the Pioneer Cycling demonstration:
ctl -p PioneerCycling -t AtgProjectBuilder -o atg -c generate-jobs -- -defaults $CTL_BASE/depots/PioneerCycling/modules/AtgProjectBuilder/templates/defaults.xml -upload
The new jobs will be listed on the home page of JobCenter.
Step #4: Upload packages to the repository
The solution library also manages all the platform (3rd party) software packages needed to establish working ATG Commerce environments. The only assumptions are that you have a compatible OS image at your disposal, a user account with the ControlTier client installed and available, and sufficient disk space to deploy the platform and application software.
The general method of adding 3rd party packages to the ControlTier repository is by uploading them using Workbench:
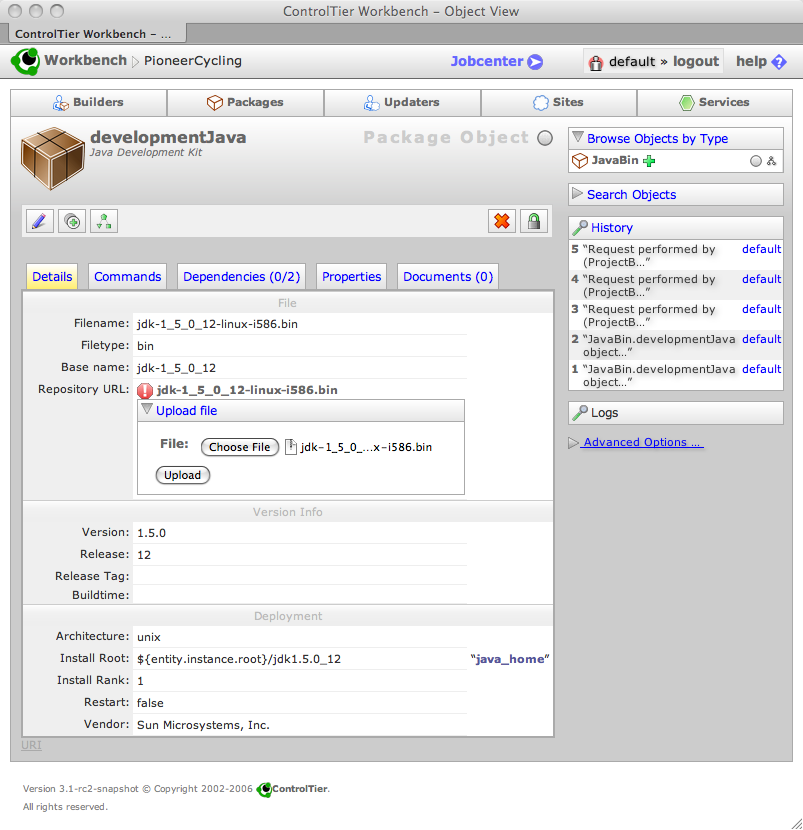
If your intention is to run the Pioneer Cycling demonstration and you have generated and configured the example library objects mentioned above, then upload the following packages into the ControlTier repository via Workbench (i.e. select package objects and upload one at a time):
- The Linux self-extracting file version of Sun's Java Development Kit 5.0 (http://java.sun.com/products/archive/j2se/5.0_12/index.html).
- The binary distribution of Ant 1.7.0 (http://ant.apache.org/bindownload.cgi).
- The Zip version of the JBoss 4.0.3SP1 subscription or community edition (http://labs.jboss.com/jbossas/downloads/)
- The ATG 2006.3 for UNIX binary installer extracted from the downloaded Jar file obtained from their customer product downloads page (https://www.atg.com/esupport/product_resources):
$ jar tvf ATG2006_3-1.jar 0 Wed Jun 28 14:22:34 PDT 2006 META-INF/ 71 Wed Jun 28 14:22:34 PDT 2006 META-INF/MANIFEST.MF 310858852 Wed Jun 28 13:03:02 PDT 2006 ATG2006.3.bin $ jar xf ATG2006_3.jar ATG2006.3.bin $ ls -l ATG2006.3.bin -rw-r--r-- 1 atg atg 310858852 Dec 6 23:25 ATG2006.3.bin - Create and upload an ATG license Zip file called "atg-license-2006.3.0.zip" containing whichever license files are appropriate for your environment:
$ unzip -l atg-license-2006.3.0.zip
Archive:  atg-license-2006.3.0.zip
  Length     Date   Time    Name
 --------    ----   ----    ----
     1177  12-07-07 09:47   ABTestLicense.properties
     1114  12-07-07 09:47   ADCLicense.properties
       27  12-07-07 09:47   ATGSearchLicense.properties
     1157  12-07-07 09:47   B2BLicense.properties
     1099  12-07-07 09:47   B2CLicense.properties
     1141  12-07-07 09:47   CommerceAssistLicense.properties
     1168  12-07-07 09:47   DASLicense.properties
     1223  12-07-07 09:47   DCSABTestLicense.properties
     1183  12-07-07 09:47   DCSADCLicense.properties
     1213  12-07-07 09:47   DPSLicense.properties
     1126  12-07-07 09:47   DSSLicense.properties
     1094  12-07-07 09:47   ForumLicense.properties
     1164  12-07-07 09:47   KnowledgeLicense.properties
     1175  12-07-07 09:47   MerchandisingLicense.properties
     1201  12-07-07 09:47   OutreachLicense.properties
     1091  12-07-07 09:47   PortalLicense.properties
     1242  12-07-07 09:47   PublishingLicense.properties
     1246  12-07-07 09:47   ResponseManagementLicense.properties
     1178  12-07-07 09:47   SelfServiceLicense.properties
 --------                   -------
    21019                   19 files
Step #5: Check out the (ControlTier) Pioneer Cycling demonstration source
Although the Pioneer Cycling sample application itself is distributed with the ATG platform, there is an Ant build file checked into the ATG Solution Library's repository at Moduleforge that is necessary for the demonstration to work. This file is stored in a trivial CVS repository included to represent the source code management (SCM) in a realistic setup.
Checkout the files on whatever system you've designated the development box as follows:
$ mkdir -p $CTIER_ROOT/demo/atg
$ svn checkout https://moduleforge.svn.sourceforge.net/svnroot/moduleforge/atg/branches/3.2.4/demo/PioneerCycling/cvs $CTIER_ROOT/demo/atg/cvs
A  /home/atg/ctier/src/atg/demo/PioneerCycling/cvs/CVSROOT
A  /home/atg/ctier/src/atg/demo/PioneerCycling/cvs/CVSROOT/cvswrappers
A  /home/atg/ctier/src/atg/demo/PioneerCycling/cvs/CVSROOT/cvswrappers,v
.
.
.
A  /home/atg/ctier/src/atg/demo/PioneerCycling/cvs/PioneerCyclingJSP
A  /home/atg/ctier/src/atg/demo/PioneerCycling/cvs/PioneerCyclingJSP/build.xml,v
Checked out revision 419.
Optional Step: Check-in generated files
It is considered best practice to maintain the files generated by generate-objects in a source code repository.